Quick + Easy: Zippered Pillow Cases (With Optional Piping!)
Zippered pillow covers are such a fun and quick sew, a great way to learn a thing or two about installing a zipper and they're perfect for home décor that you want to keep fresh as the seasons and holidays come and go.
If sewing is a super power, zippered pillow covers are as good as a trusty sidekick!

Supplies
- Pillow Form
- Fabric (woven fabrics like canvas, duck or linen are easy to sew and can give you a nice clean look but this tutorial will work for just about any fabric including faux fur!)
- All purpose zipper that is a few inches shorter than the side of the pillow you'll be installing it on.
- Thread and pins.
- Sewing machine and a zipper foot.
- Iron and ironing surface.
- Scissors or a rotary cutter, and self-healing mat and a ruler.
- OPTIONAL - Piping (I prefer to just pick this up pre-made though you could make your own).
- OPTIONAL - Serger to finish the raw edged (or you can use your sewing machine).
Step 1
Measure your pillow forms and cut your fabric to the same size. If you cut to the same size your pillow will be more full and a bit squishy. If you make your cover oversized the pillow may look a bit sad and flat.
Cut 2 pieces of fabric the same size - 1 for the pillow cover front and 1 for the pillow cover back.

Step 2
Let's just jump right in with the zipper.
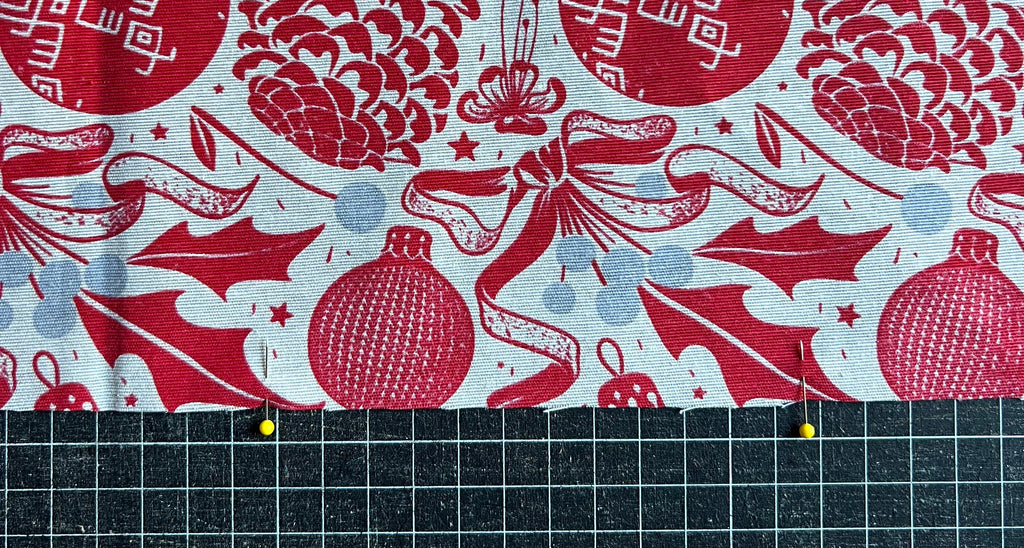
Lay your zipper on the right (pretty) side of the front pillow cover piece. Pick whichever edge you’d like the zipper to be on and center it between the corners - you can eyeball this, it doesn't have to be perfect.

Place a pin on each side of the zipper where the zipper teeth end. Stick the pins through the fabric but not the zipper then remove the zipper and set it aside.
Step 3
Simply skip to the next step if you don’t want piping on your pillow cover.
On the right (pretty) side of the pillow cover front, lay the piping out around the outer edge. The raw edge of the piping will match the raw edge of the fabric and you’ll start and stop about ¼” further toward the corner than where you placed the pins for the zipper AND be sure to leave approximately 1” of excess piping on each side. Pin the piping in place using several pins on each side and making sure to line the raw edges up neatly.

To go around the corners of the pillow you will need to cut a small snip into the seam allowance of the piping (the part that lays flat not the round hump of the piping). This will enable you to make a tight turn. See the picture below to understand.

Using a ¼” seam allowance (the distance from the edge of the fabric to the stitches) sew around the piping stopping and starting at the first and last pins you placed for the piping.

Step #4: Install the zipper.
Now lay your 2 pieces of fabric neatly on top of one another with all the edges matched up and the right (pretty sides) of the fabric touching one another. Double check to be sure the design on your fabric is facing the direction you want on both the front and the back. If you added piping it will be sandwiched between the pillow cover front and back pieces.
Take the pins you have placed on the pillow cover front piece and carefully add the pillow cover back piece to it so that the front and back of the pillow cover are now pinned together neatly right where you had previously pinned at the ends of the zipper teeth.

With a ⅜” seam allowance (the distance from the edge of the fabric to the stitches) sew from the corner of the pillow cover to the pin on each side. At the beginning and end of each stitch, make sure that you lock your stitch by reversing over it several stitches. If you're not sure how to do this check your owner's manual as many modern machines have this function built in.

If you are adding the piping, you will need to use a zipper foot to sew the rest of the pillow cover. Attach your zipper foot - check your manual for instructions - and then make sure the zipper foot is resting right next to the piping as you sew (this will be a ⅜” seam allowance). You will need to secure the ends of the piping into the pillow cover’s seam so, pull the excess end of the piping out between the layers of the pillow cover and sew over it as you near the pins.

Open up the 2 sides of the pillow cover now that they're connected and then press the seam allowance open and flat.

Now lay the zipper with the pull tab face down, back into place on the fabric. Place the zipper so the teeth end just at the stitching. Pin the zipper in place by pushing a pin through the fabric and under the zipper then back through the other side of the fabric. Do this with several pins along the length of the zipper.

Attach your zipper foot - check your manual for instructions. You’ll notice that the zipper foot is basically missing half of your regular foot, that’s so you can sew close to the teeth of the zipper so, line up the “missing” side of the zipper where the zipper teeth are so that the zipper foot is nestled right next to the teeth and, starting at the opposite end of the zipper pull (you’ll have to feel around for it since you can’t see it), sew a straight stitch from one pin to the other - making sure to lock your stitches as you did before. Go slowly and when you get to the zipper pull, stop sewing while your needle is down through the fabric (or you can use the hand crank on the right side of your machine to manually lower it if you need to) then, lift the presser foot up and slide the zipper pull down the teeth away from where you’re sewing. Put the presser foot down again and finish the last few stitches to the pin.

You then need to do exactly the same steps on the other side of the zipper making sure that you have the zipper foot nestled correctly against the zipper teeth as before.
Zipper install COMPLETE! Take your pillow cover off of your sewing machine and admire your excellent work.
Step 5
This step is optional but I think it’s totally worth it. Lay your pillow cover out flat with the right side up. You’ll see that the stitches that attached the zipper are just kinda hanging out there. I like to finish that look by creating nice boxed ends so, replace your regular sewing foot and carefully line up the needle at the end of the stitches and continue to sew a couple more (remember to lock your stitches!) forward, then make a 90 degree turn, sew a few stitches until you can make another 90 degree turn and sew down until you meet the other side. Do this for each end of the zipper. If you feel more comfortable, you could draw the box-end shape out with some tailor’s chalk or even a pencil so that you have a guide before you start sewing.

Step 6
Lay your pillow cover out with right (pretty) sides together again. Place pins around the edges to make sure everything stays in place and be sure to open your zipper a bit so you’ll be able to open and turn the finished pillow cover when you’re finished sewing. Now simply sew around the remaining 3 sides of the pillow cover with a straight stitch and a ⅜” seam allowance.

Step #7: Cut the corners.
To make the corners pop out a bit more squarely, cut a 45 degree angle at each corner leaving about a flat ¼” seam allowance at each point.

Step #8: Finish the raw edges.
This is another optional step but, one great thing about removable pillow covers is that you can wash them! To make sure the edges don’t fray away in the wash you can either serge the raw edges of the pillow cover or use an overcast stitch or zig zag stitch on your sewing machine. Use a wide zig zag stitch and line it up so that the needle goes through the fabric on one side and just misses it on the outer side. That will keep the edges in check!

Turn your pillow cover, poke out the corners with your finger or the back of a pencil, stuff in the pillow insert, zip up and enjoy!